
Paskha- Crustless Molded Cheesecake (Russian Easter)
Paskha (also spelled Pascha) is a rich sweet and creamy Eastern European festive dessert. This Paskha recipe will make 2 medium sized molds (2-6″ terracotta flower pots work great). If you have one large Paskha mold you will just have extra to enjoy separately. I sometimes make 1 large and 1 small too.
- Prep Time: 12 hours
- Total Time: 12 hours
- Yield: 12 1x
- Category: Dessert
- Method: No Bake
- Cuisine: Eastern European
- Diet: Gluten Free
Ingredients
Units
Scale
- 1 1/2 lbs Farmer’s cheese (About 4 cups) You can make your own if you can’t find it at the store with Haniela’s Recipe for Farmer’s Cheese I make her “Large Batch” and use it all.
- 1/2 lb (2 sticks) unsalted butter, softened (not melted)
- 1 cup sugar
- 5 hard-boiled eggs , yolks only
- 1 cup real sour cream (no low fat)
- 1 standard vanilla bean, middle scraped out and the rest finely chopped (we like to use the Madagascar kind)
- 1 tsp vanilla extract
- 1 tsp almond extract
- Zest of 1 full lemon
- Zest of 1 full orange
- Juice of 1/2 lemon
- 1 pint heavy whipping cream
- 1/4 cup sliced almonds, lightly toasted ** If you don’t like almonds or someone is allergic, you can leave them out **
- 1/4 cup of chopped up raisins (Optional)
Instructions
- Using a mixer with the whisk attachment, beat the butter and sugar till well combined, then add egg yolks and beat again till well incorporated.
- Now add farmer’s cheese, sour-cream, extracts and vanilla bean. Beat until well mixed.
- Add zests and lemon juice and mix once more.
- Once this mixture is well incorporated and there are no obvious lumps transfer this mixture to a medium mixing bowl, scraping the bowl and attachment.
- Add your heavy whipping cream to the mixer’s mixing bowl. With the same whisking attachment beat the whipping cream on a fairly high speed without splashing out of the bowl until your cream has peaks and has softly stiffened.
- Gently fold in the cream and sliced almonds and/or raisins into your cheese mixture until it is well incorporated and you no longer see pockets of cream.
Filling the Paskha Molds
- Place the cheese cloth over the insides of each upside down flower pot, making sure to cover all sides, leaving enough extra on top to be able to cover the tops.
- Wet cheese cloth in pots over a sink with water. (This makes it easier to fill your pots with the paskha so that the cheese cloth doesn’t keep moving and falling into the pot)
- Fill both flower pots evenly with the Paskha cheese mixture. Leave about an inch on top unfilled. This allows for room to fit your plates and weights on top of your molds.
- Gently fold the remaining cheese cloth over the tops of your cheese mixtures.
- Place your small plate or bowl atop your cheese cloth covered paska.
- Now place your weights on top of each plate to weigh down your molds. (You want your weights to be heavy enough to just push down on your molds, allowing the extra liquids to seep out of the bottoms)
- Place your bowls under the molds to catch the liquid.
- Place paskha molds into the refrigerator for at least 10-11 hours. Overnight is ideal.
Uncovering and Presenting Your Paskha Molds
- This is the moment of truth. Only do this when you are close to presenting them to your guests, giving yourself enough time to decorate them as well. If you have room in your fridge you may do this earlier and place the molds back in your fridge after you decorate, but only do this if you truly have room for them to sit undisturbed.
Release the Paskha
- To remove the paskha from the mold, have a plate ready that you will present and serve the paskha on. Remove the weights and dump your draining bowls.
- Uncover the tops of your molds. Once tops free of cheese cloth, place your plate on top and gently flip over the pot onto the plate.
- Gently tap on the pot a few times to release the molds onto the plates. Once you feel the Paskha flop down onto your plate, take a deep breath and gently lift the pots off.
- Gently remove the cheese cloth from the forms and discard the cloth.
- You’re ready to decorate your paskha.
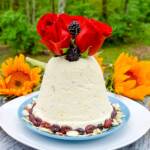
Decorating your Paskha
- Get creative here, but remember sometimes simpler is more attractive.
- You can top your paskha with flowers, line sides or bottom edges with berries, nuts or dried fruits. Besides the flowers, make sure the rest of your decor is all edible for your guests.
- Enjoy this rich, creamy indulgence!
Equipment
Notes
Paskha is traditionally served with a sweet Easter bread called, Kulich (recipe in the future)
For the Farmer’s Cheese, if you’re making it yourself, *I make her “Large batch” and it makes 1 lb, 10 oz. which is pretty much perfect and I use it all.*
Keywords: Paskha, Pascha, Eastern European
Find it online: https://wholemadeliving.com/paskha-russian-crustless-cheesecake/